Thursday 17 February 2022

Samll details make a big difference - part 2: Add geometric shapes to the flowers on your cards -

 Hello, fellow crafters

Today I am sharing the second post on adding geometric shapes to the flowers on your cards, for high visual contrast and impact.

 No photo description available.

The outer stitched squares were cut using a Nellies die set. 

The inner square and aperture were cut using one of the six sets of nested dies from the Studio Light die set #4. 

The flowers were created using the floral stamp and die from the Heartfelt Creations curvy floral frame stamp-and-die set. All of these are available from our online store 


Nellies stitched squares die set at this link 

Studio Light nested die set at this link

Heartfelt Creations curvy floral frame set at this link  

Thank you for visiting.

Happy crafting, until next time.

Marie Smith


Country cottage vellum petunias

 Hello, fellow crafters

Today I am sharing the technique for making a pretty card with vellum petunias. This is my most favourite flower stamp-and-die set for vellum flowers, because of the beautiful details on the petals.


You will need:
  • Heartfelt Creations small classic petunia stamp and die set
  • Heartfelt Creations classic oval frame die set
  • Heartfelt Creations paper pad - I used a sheet from climbing cleamtis, because it matched the colours of my flowers
  • Versamark embossing ink pad
  • Ranger superfine white embossing powder
Instructions: 

Stamp 2 of the smaller flowers and 2 of the spray from the large classic petunia set on vellum, using Versamark ink pad. Stamp 6 of the largest and 2 of the smallest flowers from the small classic petunia set on vellum, using Versamark ink pad.

Sprinkle the stamped images with white Ranger super fine embossing powder. Shake off excess, and heat-set the images with a heat tool.

Put the heat-embossed flowers face down. Use Heartfelt Creations daubers and Ranger archival ink in cactus flower and deep purple to colour all flowers at the back. Add a small circle of olive in the centres of the flowers. Colour leaves and the leafy areas of the spray with Ranger archival ink olive.
Cut all the flowers, leaves and sprays out with the coordinating dies.
For the largest and medium flowers, glue together two layers. leave the smallest flowers as a single layer. Add crystal flower centres to all flowers.

Cut a shaped card base from white cardstock, by placing the largest die from the fancy classic oval frame slightly over the fold of a pre-folded card, so that the card base is not fully cut on the fold.
Cut a front for the card from a purple sheet in the climbing clematis paper pack, using the same large die as used for the card base. Adhere this purple piece to the card base.
Cut the second and third dies from the fancy classic oval frame from white cardstock, and adhere them to the purple paper.

use the oval die from the fancy classic oval frame to cut a scene with a picture of a house from the climbing clematis paper pack. Adhere this to the centre of the oval die cut.
Arrange and adhere the flowers and sprays on the card. TIP: Use only the ends of the sprays, for balance of size.

 
Thank you for visiting.

Happy crafting, until next time

Marie Smith

Tuesday 15 February 2022

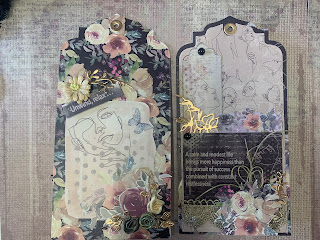
Just breathe affirmation tag booklet

 Hello, fellow crafters

I created this affirmation tag booklet using the Fabscraps C137 Just Breathe collection.


We often need to remind ourselves to just breathe deeply in the current situation.

This paper collection is perfect for all kinds of papercraft projects to affirm being calm, to encourage others, and to journal about our experiences. I made this little affirmation tag booklet to keep on my desk – within easy reach when I feel things are getting a bit tough.

For This Project You Will Need:

·        FabScraps C137 Just breathe papers, including sheet for fussy-cuts and sentiments sheet

·        Fabscraps small satin ribbons in various colours

·        Fabscraps ribbon pack

·        Fabscraps black flat-backed pearls

·        Fabscraps white craft glue

·        Fabscraps small copper album ring


Other products used:


·        Large tag die set

·        Rose gold metallic cardstock die-cut leaves

·        Lace – black, cream, taupe

·        Light brown thin twine

·        Glitter

·        Paper flowers

·        Small tassel


Instructions:

1.      From your selected Just breathe paper sheets, cut out 5 large tags and some in a slightly smaller size for double layers. If the die you use does not cut holes at the top of the tags, use a paper punch to make a hole at the top of each tag.

2.      Fussy cut all the fussy-cut elements and cut out some of the words on the sentiment sheet.

3.      Layer two sizes of die-cut tags, as preferred.

4.      Embellish the tags with fussy-cut elements, your selected words, lace, flat-backed pearls and die-cut leaves.

5.      Tie the tags together with the album ring, and tie some ribbons and a small tassel around the metal ring.


 Thank you for visiting.

Happy crafting, until next time.

Marie Smith


Triangle tri-fold card with belly band

 Hello, fellow crafters

Special-fold cards always offer a surprise to the recipient.

Today's tutorial features one of the Heartfelt Creations floral banners on the belly band of this triangle tri-fold card.

Card base:

1.       Cut and score 2 pieces of cardstock of 29x14,5 cm as follows:


1.       Mark and score as follows:


1.         Adhere the pieces together as follows:


  5. Complete the card: