Saturday 14 October 2023

Stencilling 101 - Part 1: Distress inks

 This is part 1 in a short series of posts on the basics of stencilling, using Distress /Distress oxide ink pads or other water-based ink pads.


MATERIALS USED:
  • Extra smooth cardstock 300gsm
  • Distress/ Distress ink pads, or other water-based ink pads in various colours
  • Succulent stencil PM-S011 by The Purple Magnolia
  • Stencil tape or low-tack tape (Altenew purple tape or Studio Light stencil tape)
  • Dotted paper from our What the succulent? collection
  • Sentiment from one of the Wordies sets - Everyday
  • Studio Light or Altenew blending brushes.
TIPS:
1. For good results, use a smooth cardstock. The new, extra smooth 300gsm cardstock, available from our online store. It helps achieve a smooth, blended result.
2. Secure the stencil to the white cardstock with stencil tape to keep it in position. be sure to mask the stencil number so you don't accidentally stencil the numbers.
3. Select ink pads. for this card, I used Distress inks in a variety of colours, that are typical colours for succulents in our country: squeezed lemonade; tattered rose; seedless preserves; evergreen bough and peacock feathers.


4. Apply the first colour in a few areas - never have a colour in only one area: repetition "binds" the image. start with the lightest colour and work towards the darkest colour. I started with squeezed lemonade, then used tattered rose, seedless preserves, evergreen bough and ended with peacock feathers.
5. Overlap colours for smooth blending and an interesting effect.


After stencilling, I trimmed the piece of cardstock to 13 x 13cm and adhered it to the dotted square, 14 cm. This was adhered to a square card base (14,5cm) and the sentiment added.

Thank you for popping in. Please do leave a comment. or ask a question if you have any.

Happy crafting, until next time.

Marie Smith


Friday 25 August 2023

Pink rippled poinsettias for Christmas

 How time flies - it is incredible that one moment it is March and the next we are preparing for Christmas.

I haven’t posted any blogs in some tine, but have made so many cards to inspire followers.

Today, I am giving brief instructions for a Christmas card in non-traditional colours.


It will look equally charming in traditional colours if you colour the poinsettias red.
Create a square card base, 14,5x14,5 cm. 
Add a layer of silver mirror cardstock 14x14cm.
Create the textured layer by stencilling texture paste onto a white cardstock square of 13,5x13,5 cm. I used  the Crafters Companion holly jolly stencil set. While the texture paste is still wet, sprinkle WOW embossing powder white twinkle over. Shake off the excess powder and melt the embossing powder with a crafting heat gun. While you do this, the texture paste will pop up a bit, creating lovely dimension.
Adhere this layer to the card base.
Die cut Creative Expressions Jamie Rodgers rippled poinsettias from heavy cardstock - I used the white curious metal 300gsm that we stock in our online store. Colour the flowers with a dauber dabbed onto an ink pad, or use Creative Expressions gilding polish. Shape tge flowers using a ball tool.
Complete the flowers by layering 2 sets of petals and adding a flat-backed pearl in the centre of each.
Arrange flowers and dis-cut foliage on the card.
Thank you for visiting. Do take a minute to comment on this post.
Happy crafting, until next time.
Marie Smith


Tuesday 14 March 2023

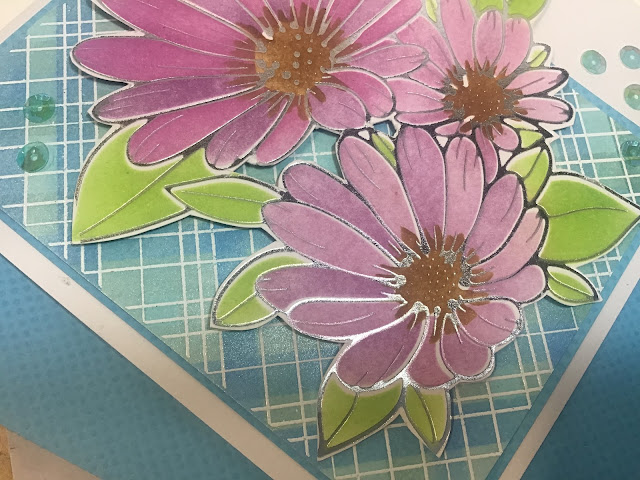
Hot foiled florals and stencilled background

 Hello fellow crafters

Today I am sharing a card using two great techniques that I combined on the card and that I really enjoyed. 

I combined vibrant florals by Altenew which I foiled with the hot foil plate and coloured with co-ordinating stencil set. I used different shades from the Studio Light teardrop ink pads in the pink shades. I cut the foiled image out using Judikens detailed scissors.

The background was heat-embossed using a Pinkfresh plaid stamp and coloured using the co-ordinating stencil set and Distress ink pads. The Studio Light large blending brushes were great for the background. I used Altenew mini blending brushes for the flowers.


Happy crafting, until next time.

Marie Smith

Saturday 11 February 2023

How to stretch your supplies for unique effects - Embossing folder and stamping foam

 Hello, fellow crafters

Today I an sharing a project created with Studio Light products, to show you how to stretch your supplies for unique effects.

It is my first time using stamping foam and I love how easy it is to use and to create elements for your cards that co-ordinate with each other.

To create the focal point, have your embossing folder open. Attach a circle piece of stamping foam to an acrylic block with repositionable glue. Heat a circle stamping foam for 10 to 15 seconds. Firmly but evenly press the stamping foam onto the embossing folder on the side that has the flowers raised.

Use Studio Light ink pads in shades of yellow to drag over the embossed stamping foam from light to dark. from about 20 - 25 cm lightly spritz over the inked foam to moisten the inks a bit. Stamp onto heavy white cardstock. Below you can see how I experimented the technique before deciding what to do with a card.

 
Cut the stamped image out with a circle die. Adhere to a circle of cardstock in a co-ordinating color.
 
Ink the inside of the embossing folder with a colour on the opposite of the colour wheel than your stamped image. I used Versamagic green oasis. Lightly spritz the inked side with water - only a little; not to wet. Insert heavy cardstock into the embossing folder and lightly spritz tey cardstock, to break the tension in the paper and get a better embossed effect. roll through your die0cussing machine, using the recommended stack of plates.
 
Remove and cut the coloured embossed cardstock to 13,5 x 13,5 cm. Adhere this to a piece of cardstock 14 x 14 cm. Adhere this to a 14,5 square cardbase.
 
Add a sentiment to your card. I sued one from a Creative Expressions Wordies set.

I hop you are going to try this technique. If you do, please shere your project below in the comments.

All products are available in our online store.

Thank you for popping in. 

Happy crafting, until next time.

Marie Smith


Thursday 1 December 2022

In the garden - mixed media card

 Hello, fellow crafters

I love my garden (mostly evergreen with a pop of colour here and there) and I love arum lilies (also called calla lilies). Today I am sharing a card featuring pink arum lilies.

 This pretty Studio Light stamp has been sitting on my desk for quite some time, waiting for inspiration to do it justice. I knew I wanted to create a water-colour effect and a journal-style background. But don't be intimidated (I know many crafters feel intimidated by watercolour techniques - no watercolouring here. I used an ink squishing technique that I developed recently with heat-embossed images.

What I often do while waiting for the final inspiration to use a specific product, is to put the things I think I could use out on a side table next to my main desk. In time, ideas grow and then I know what I want to do. This card was finally inspired by the prompt on the Ujabule Art Journalling Facebook page: In the garden.

The process I followed was as follows:

1.  Masked the edges of a 13x13cm piece of watercolour paper with washi tape.

2. Brayered Distress Oxide salvaged patina to cover the unmasked square.

3. Brayered a small amount of Distress Oxide seedless preserves.

4. Splattered water onto the inked paper and allowed it to sit a few minutes before blotting the drops with a paper towel.

5. Heat-embossed the Studio Light calla lily stamp with white embossing powder onto watercolour paper.

6. Dabbed seedless grape and mowed lawn Distress oxide inks onto my glass mat and spritzed with water, to form watercolour ink. 

7. Roughly cut out the heat-embossed image and pressed it face down into the watercolour inks, with the flowers more or less in the seedless grapes and stems and leaves more or less on the green mowed lawn. When the image was dry, I used my finger to add more pink and green on selected parts of the image, for more intense colour in the centres of the flowers and on some parts of the leaves. Cut out, close to the edges of the image, with detail scissors.

8. Used seedless grape and salvaged patina inks to stencil in the background, using the Studio Light mask Birds and twigs.

9. Stamped some borders left, right and at the bottom, to "ground" my image.

10. Adhered the calla lily image with dimensional tape.

I hope you enjoyed your short visit.

Happy crafting, until next time.

Marie Smith


Saturday 12 November 2022

Nativity card

 Hello fellow crafters


For today’s card,  I used the Crafters Companion Bethlehem die set. The elements were die-cut from our heavy curious metal cardstock for the lovely effect. They were mounted onto a navy square, which had been mounted on a silver mirror cardstock square. Both these squares were cut out with Nellies stiched square dies.

The stars were stencilled with Cosmic Shimmer frosty sparkle paste, using our PM-S001 stencil.

Get the supplies from our online store.

Happy crafting, until next time.

Marie Smith

Tuesday 8 November 2022

Wildflower field

Hello fellow crafters.

Today I am sharing a card on which I  used the Studio Light decorative leaves die set.


I wanted to create an informal effect so I decided to colour the leaves and flowers with brush pens for a watercoloured effect.

The elements were die-cut from watercolour paper.
I used brush pens to loosely apply only a little colour. For the stems, for example, I applied lime. I then sprayed generously with water before applying moss.
Orange and purple were used to colour the flowers in the same manner.
I used the Studio Light flower silhouette embossing folder to create a background. This piece of cardstock was distressed around the edges and layered onto lime green cardstock of which the edges were also distressed before adhering it to the card base.
Stems and flowers were arranged informally.
I hope you enjoyed this post.
Happy crafting, until next time.
Marie Smith


The Purple Magnolia Papercraft