Thursday 28 February 2019

Double pocket card with two tags


I found my inspiration for this pretty pansy double pocket card and the instructions on a video which you can watch here. https://www.youtube.com/watch?time_continue=124&v=13rwZJg_C_Q
The pictures below show how I followed the steps, but adapted to make a square card using the lovely Heartfelt Creations Burst of spring papers,  because I wanted to insert two large tags where I could write messages at the back of the tags. 
For the tags, I die-cut pansies from the paper pack but the pansies displayed next to the card in the photo above were made using the Cheery pansy stamp and die set. I used Brilliance inks in Pearlescent lavender and pearlescent orchid to colour them.


Thank you for visiting. I hope you enjoyed the short stay and would spend a few seconds to leave me a comment.
Have a lovely day and weekend.
Marie Smith

Tuesday 26 February 2019

Formed leaves for foamiran flowers


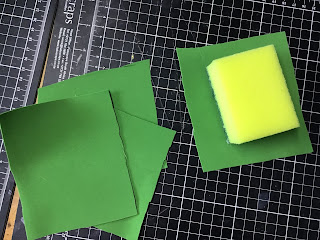
Cut a few rectangles of foamiran a bit wider or longer on two sides of a kitchen sponge.


This mould is from a pair that fits together but I find I get better results using only the one part.

Heat an iron on high setting. Wrap the foamiran around two sides of the sponge.
Press the foamiran against the iron with the sponge for about 4 seconds.


Quickly press the foamiran down into the mould, using the sponge to apply firm pressure. Make sure you press it down firmly. You may apply extra pressure with your fingers into the indentations.


Keep down for about 5 seconds and remove.


Cut your leaves out with a scissors or use a die to cut out.


Add some red colour randomly using soft pastel and a sponge.


 Lay the leaves upside down and adhere a piece of wire to the leaves with a hot glue gun or instant glue.


 Attach the leaves to the stem of your rose by using florist tape to wind around the wires.


Hoping you found this tutorial useful and that you will spend a few seconds to leave me a comment.
Have a great day.
Marie Smith

Sunday 24 February 2019

Lilac and teal hydrangeas on lace


I love hydrangeas - both because, I think, pinks and purples are my favourite colours, and because of the beauty of the complex clumps of flower heads.
To make the card, start with preparing a card base of 14,5cm square from a sturdy cardstock. In South Africa I do this, because our A4 papers are not exactly 30cm long so a 14,5cm square card works better.
Cut light purple cardstock 14,5 cm and printed paper from the Heartfelt Creations Lush lilac paper pad 14x14cm. The Lush lilac paper pack has the most amazing soft colours and pretty designs. Adhere the two mats to your card base.
Use the Craft Passion flower 07 die to cut several flowers. (These sets have 3 different flower designs in 2 sizes each and they are perfect for small paper and foamiran flowers.) Colour the flowers with daubers and Versamagic oasis green and Brilliance pearlescent lavender. I find the Heartfelt Creations daubers great for colouring all kinds of flowers, but especially smaller ones.


Place the flowers face down on a flower shaping mat and use a ball tool from the Heartfelt Creations Deluxe toolkit to shape the four petals of each flower. Turn them facing upside and press down into the centre of each flower.
Pierce a small hole in the centre of each flower and pull a 3mm pearl stamen through. Put a small dot of glue at the back to adhere the stamen on each flower.


While you wait for the glue to dry, cut the two shapes out of white sturdy cardstock 240gsm, using the Butterfly kisses decorative die set.


Glue them down, a bit offset to the left and bottom - that is, not exactly in the centre of the card base, to add some interest to your card design.
Snip the stamen threads off at the back right against of the base of the flowers.
Die cut 3 sets of leaves using Lady E Design Leaf 5 and colour them using the oasis green ink and Versamagic key lime.
Arrange flowers and leaves on the round die cut, leaving some of the lacy edge to show.
I hope you found some inspiration to make a pretty card. If so, please take a few seconds to leave me a comment about your impression.
Have a lovely day
Marie Smith


Saturday 23 February 2019

Pink blossoms to say thank you


Pretty pink blossoms with stamen on layers of lacy die-cuts make this a very special card to say thank you to someone. It is also suitable for a birthday and even a wedding or Mother’s day card.
Cut the flowers with 5 petals out 8 times from smooth sturdy white cardstock such as 240gsm.
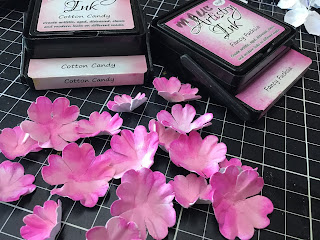
Use daubers to randomly add Artistry inks in cotton candy and fancy fuchsia.


Turn the foowers around so that the coloured sides face down. Spritz very lightly with water. Pinch each petal between your nails to form creases. Put the flowers down, colour facing up, on a flower moulding mat and press down in the centre with a ball tool.
Leave the flowers to dry. make a small hole in the centre of each flower, using an awl or a picking tool. Pull three stamens through the hole in each flower. Do not pull them down all the way - leave them to stand out a bit. Add a small drop of glue in the centre of the flower to keep the stamens in position. When the glue is dry, snip the stamens off at the back, close to the flower bases.
While you wait for flowers to dry, prepare a 14,5cm square card base and cover with printed paper.
Die-cut the three largest layers from the Avery frames and tag set. Keep the twirly ‘dropouts’ from the die-cuts to use as twirls.
Stamp a sentiment on the smallest die-cut element.
Layer the die-cuts on the prepared card base, with craft foam between layers to add depth and dimension to the card.
Arrange and adhere the flowers and twirls on the card.
I hope you found some inspiration to go and make a pretty card. If so, please take a few seconds to leave me a comment.
Have a lovely crafting weekend.
Marie Smith


  1. K

Friday 22 February 2019

Forever in love layout

Today's post is aimed at the scrapbookers. The "Forever in love" paper pack from Lemoncraft is so pretty with its loosely-painted flowers and borders. it is ideal for pages of your Valentine's day, weddings, or any special moments with family and friends.
I have added a sheet of butterflies to cut out to the paper pack to enhance and brighten the colours on your layouts.


The papers in the pack have music and lace as background.

To make:
Cut out several elements - flowers, leaves and butterflies, as well as the title.


Cut photo mats - one of 17x12cm from shimmery peach cardstock and one of 16,5x11,5cm from paper with music notes. Layer these and position them slightly to the left of your page.
Arrange and glue down your main flower elements. if you want the flowers to slightly overlap your photo, remember to either position the photo first, or leave out glue behind some of teh flowers that will overlap the picture.


Complete the page by adding the rest of your elements.


 I hope you have enjoyed the short visit. if so, please leave your "footprint" by means of a comment.
Have a lovely weekend.
Marie Smith


Tuesday 19 February 2019

Flowers and lace


For this card, I stamped and heat-embossed the dress form and flowers from the Heartfelt Creations Floral fashionista stamp and die set on vellum paper with Versamark ink. White embossing powder was sprinkled over the ink and it was set with a heat gun.
I used daubers and ink to colour at the back of the images before they were cut out with the co-ordinating dies. Extra colour was added, using alcohol brush markerThe lace was adhered with a few spots of glue, before arranging the floral fashionista dress form and flowers.
I hope you enjoyed this extra touch of femininity.
Have a lovely day
Marie Smith

Products used:


Thursday 14 February 2019

Sun burst


Delightful daisies and butterfly kisses created using Heartfelt Creations stamp and die sets.

I stamped the flowers  and butterfly on vellum with Versamark then sprinkled with white embossing powder and heat set with a heat gun.
These were then cut out with the co-ordinating dies. I used daubers and ink stamp pads to colour the elements at the back.
I hope you enjoyed your short visit. If you enjoyed, please do take a few seconds to comment. Have a great day.
Marie Smith

Round layers with hydrangeas


Good morning on a lovely rainy day in Pretoria! I have the privilege of looking down into the garden from my workspace on the first floor and hearing the rain and dripping water.

Today's card features hydrangeas made using Lady E's flower 005 (hydrangea) die with the indentations that add so much texture and interest to your flowers because the indentations remain uncoloured when you use a dauber or small sponge to colour the flowers.


I used Heartfelt Creations eyelet circle dies for the "window". The card base is 14,5 cm square. I cut 3 squares of 13,5 cm. The top circle was cut out using the largest die in the set. I used this to mark where the circle had been cut out, to precisely position the second largest die on the second square. This step was repeated with the third largest die. after adhering purple printed paper to the card base, the squares were layered onto the card base with 3D tape, starting with the square with the smallest opening.

The flowers were die-cut from heavy (240gsm) smooth white card stock. Colour was added with daubers. I first added green randomly, with teal ink with a dauber that had previously been used with lime green ink. This resulted in a lovely variation of greens. Then I added Ranger archival deep purple ink. a ball tool was used to shape the petals of the flowers on the back. They were flipped over and pressed down in the centres before adding a bead in the centre of each flower. I also cut some of the smaller leaves in the Flower 005 set, and two twigs, using Lady E Leaf 05 die. The leaves were coloured in the same way that the green was added to the flowers.


The sentiment with "shadow" die is from The Paper Boutique sentiments V set.


Thank you for visiting. I will appreciate you taking a few seconds to leave me a comment.
Have a lovely day
Marie Smith 
 

Tuesday 12 February 2019

Colour burst

"


Cheerful pansies always make one aware of a burst of colour. These are just so colourful in yellow and purples, especially with the addition of the yellow bush stamens as bunches of small flowers.

.

The Heartfelt Creations cheerful pansies were stamped with Distress ink in seedless preserves. The co-ordinating dies were used to cut them out. Their centres were then coloured with a dauber and Ranger archival ink in buttercup yellow. Next, I used a Copic marker Y35 to add brighter yellow stripes in the centre, flipping the pen from the centre outwards so the lines would be thinner as they radiate away from the centre. I left the inner ckentres in the light yellow for a bit of contrast.
The edges were coloured with a dauber and the seedless preserves ink, working from the outside to the inside. This results in a nice dark edges. The pictures below show colouring before die-cutting but I experimented and got better results by fist cutting amd then colouring.


Although a lovely mould is available that helps with texture and shaping many flowers simultaneosly, I was in a relaxed mood and shaped them by hand using a ball tool.
The flowers were assembled by sliding the 2-petal piece behind the twonlower petals, and glueing the two pieces together. Heartfelt Creations has a video showing how to do this.
Leaves were stamped using Artistry green garland and colouring with that and Distress oxide in key lime. I dabbed a few yellow spots randomly.
The card base is 14,5x14,5cm and I used one of the pretty printed squares from the Burst of soring paper back as background.
All Hearfelt Creations products can be bought in our online store www.purp,emagnolia.co.za/collections/heartfelt-creations. The inks are available in the Ink category and the bunch stamens can be found at www.purplemagnolia.co.za/collections/foamiran.
I hope you are inspired by this post to go and create colourful pansies. If so, please let me know in the comments how this card and tutorial made you feel.
Thank you for visiting. May you enjoy a cheerful day.
Marie Smith

Saturday 9 February 2019

Floral fashionista with diamonds


Today I want to share a romantic card with lots of feminine elements - floral fashionista die-cut from the paper pack. The background paper is from the same pack.
I cut the lacy tops and bottoms off a die-cut done with the lacy diamond die.
The bluish purple flowers were made using the Oakberry Lane stamp and die set. the flowers were stamped with Ranger archival ink in deep purple. I then used a dauber to loosely colour the flowers. Then I added - again with a dauber - a bit of blue, using Artistry ink in tenacious teal. Using two or three complementary colours give your flowers much ore interest than when you only use one colour. The co-ordinating dies were used to cut out the flowers bwfore shaping them using different sizes of ball tools from the Heartfelt Creations deluxe flower shaping kit. Green prills were used to complete the flowers.
The leaves were also stamped with the purple archival ink. I find that using the same colour for stamping the petals and leaves result in a binding factor when you put your cards together. I used Distress ink in key lime and Artistry in green garland to colour the leaves.

All these products from Heartfelt Creations can be bought in our online store www.purplemagnolia.co.za/collections/heartfelt-creations

Thank you of visiting. I hope you enjoyed your short stay and will appreciate if you take a few seconds to leave me a comment.
Enjoy the rest of your weekend.
Marie Smith

Friday 8 February 2019

Red and white paper hat for Valentine's day


My red and white roses on a paper hat for my mother (82), for the seniors' Valentine's tea tomorrow. The dress code is red and white and paper hats.
I used Lady E Design flower 001 die for the roses. The red roses are made of foamiran and the white one made of silk foam. My mother made her hat from unprinted newspaper, using the age-old technique she used about 55 years ago to make us pretty hats (fabric) for church. At that stage, a wooden mould was used with a mesh-like facric and special hat glue. This was covered with organza-like fabric and decorated with ribbons, netting and silk flowers. Who can remember something like that?
Have a lovely weekend.
Marie Smith

Wednesday 6 February 2019

Explosion box card with 3D tulips in a vase

Today I am featuring an explosion box card with 3-dimensional tulips in a vase.
It is so easy to give 3-dimensional shape and make lots of flowers in a short time with the 3D moulds.

I used a ready-made explosion box template and cut 10 squares of printed papers from the Tulip Time paper pack.  Four squares were adhered to the four sides of the outside of the box. five squares were adhered to the inside bottom and sides of the box. The last square was adhered to the lid, after the lid had been assembled.
A wooden chipboard vase was assembled to use inside the box.
To make the flowers, I used my Misti stamping tool to stamp several tulips and leaves, using Carnation red archival ink. I use archival ink when I intend colouring the stamped images because the archival ink does not smudge. The carnation red, blaze Artistry ink and twisted citron distress oxide inks were used to colour the stamped flowers and leaves. I like colouring the flowers with a dauber and inks before die-cutting the flowers with the co-ordinating dies, because it is an easy colouring technique that saves lots of time too.


The co-ordinating mould was used to shape the petals before assembling the flowers.

You may watch the video to learn how to shape petals and assemble the tulips: https://www.heartfeltcreations.us/video/222/how-to-create-tulips-with-the-tulip-time-collection

The completed flowers and leaves were arranged in the pot. I used a bit of hot glue to attach them to each other in a few places, so they would stay in place. The pot was adhered to the explosion box with some hot glue.


Here you see the completed explosion box and lid.


The next pictures show some details.


Thank you for taking time to visit. I hope that you enjoyed. I so appreciate your comments ... thank you for taking time to write something short. You are also welcome to ask questions about this project.
Have an awesome day.
Marie Smith