Sunday, 5 April 2020

Flowering dogwood and chocolate brown stripes


Hello fellow crafters
Today’s inspiration comes with flowering dogwood flowers, offset against chocolate brown stripes. The lovely striped paper is from Lemoncraft.


To make the flowers, use Heartfelt Creations flowering dogwood stamp set. Stamp the flowers using archival ink rose madder. Only lightly add a bit of the same colour to the edges of the flower petals using a finger dauber.
Cut the flowers out, using the co-ordinating die set.
Place the flowers face down on a flower shaping mat and shape at the back of each petal with a ball tool. Turn flowers face up and press down in the centre with the ball tool.
Glue two layers of flowers together and finish the flowers by gluing a few flower pearls in the centre of each. https://www.purplemagnolia.co.za/search?type=product&q=Flower+pearls
I used a variety of leaves cut out using Lady E Design leaves and herbs leaves dies.
All products and tools are available in the online store www.purplemagnolia.co.za
Thank you for visiting. 
Happy crafting until next time.
Marie Smith

Thursday, 2 April 2020

Family blessings single page


For This Project You Will Need:
·        Fabscraps Family blessings C121-001; C121-003; C121-011; C121-012
·        Fabscraps clear glue
·        Pink satin ribbon rose from the Family blessings card-making pack
·        Additional handmade flowers and leaves
·        Chipboard title
·        Embossing ink
·        Dark brown mixed media embossing powder

Instructions:
1.      Use C121-012 as background for the layout.
2.      Cutting guide:
2.1     From C121-001 cut the following:
                                 i.            12cm piece on the right-hand so that you will have part of the clock, cut out
                                  ii.          Strip of8x24cm, with two short ends cut into a flag shape
2.2    From C121-011 cut the following:
                                      i.          Strip 7x25cm, with two short ends cut into a flag shape
                                    ii.          Strip 4,5x19cm, with two short ends cut into a flag shape
                                   iii.          Fussy-cut roses
2.3     From C121-003, cut out 2 square frames and one of the frilly frames.
3.    Adhere the clock part on the right-hand side of page base, about 3cm from the right edge.
4.     Arrange and adhere the flagged strips to page base.
5.    Stamp chipboard title with embossing ink and sprinkle with embossing powder. Melt embossing powder with a heat gun.
6.    Adhere title to page.
7.    Arrange fussy-cut flowers, handmade flowers and die-cut leaves on the page.


C121 family blessings
Family single page
Created by Marie Smith
South Africa
Remember that you can stay updated on posts on this blog by either clicking on Follow in eh top right-hand corner of this page, or by entering your e-mail address in the block for that, to receive the posts directly in your mailbox.

 You can buy the Fabscraps family blessings from our online store by following this link 

 Happy crafting, unil next time.
Marie Smith


Sunday, 29 March 2020

Cherry blossoms


Hello, fellow crafters
The world is quiet in peak traffic time but the birds are chirping in trees in the garden. Today I am hearing weavers, sparrows and bulbuls. I know the red crested barbet will be visiting a bit later in the morning.
This card features three layers of lacy borders from a  Pinkfresh Studio set of 5 border dies, available in our online store. https://www.purplemagnolia.co.za/search?type=product&q=Pinkfresh


The cherry blossoms were made using Heartfelt Creations dies on thick watercolour paper. First, I added a drop of water in the centre of each of the blossoms with a water brush. Then I added a drop of pink watercolour onto the moistened flower centres. To shape a whole bunch at the same time, I lightly spritzed the die-cut flower with water, placed them in the co-ordinating shaping mould and rolled them through my die-cutting machine. The cherry blossom set can also be ordered from our online store. The set has a delightful little birdie that can be used to add an extra finishing touch to any card with flowers https://www.purplemagnolia.co.za/search?type=product&q=Cherry+blossom
Happy crafting, until next time
Marie Smith

Thursday, 12 March 2020

Easy flowers in 4 quick steps

Hello fellow crafters
Today I will show how to make beautiful flowers for your projects in four quick and easy steps. This is a great technique for making flowers to match your project, because they can easily be mad3 from the printed paper.


STEPS
1. Die cut flowers. I used this petal die, available in our online store


2. Place the die-cut flowers on a foam flower-shaping mat. Use a ball tool to shape each petal. You do this by using a ball flower-shaping tool that is about One-third the width of the petals. Start at the outside edge of each petal. Press down firmly and carefully pull down to the centre of the flower.


 3. Layer two flowers of the same size and secure them with a bit of glue between the layers so that petals and opening alternate between teh two layers.
4. Adhere a flat-back pearl or other flower centre.

Visit our online store for ball tools, flower-shaping mats, ball tools and a lovely selection of flower dies. We have re-organised the online store so that you can now find products in two main drop-down menus either by type of product or by brand www.purplemagnolia.co.za.
Thank you for visiting. Remember that you can follow this blog by clicking on ‘follow’ in the top tight-hand corner, or by subscribing to receive e-mails directly in your mailbox.
Happy crafting, until next time.
Marie Smith


Wednesday, 4 March 2020

Family blessings - Grandma's rocking chair

Hello, fellow crafters
Today I am sharing another one of my projects as brand ambassador fo Fabscraos, using the fabulous and absolutely inspiring C121 family blessings collection, to celebrate family blessings.


Family blessings come in so many ways, but when I start counting, I know the love and care of a mother and/or grandmother are among the most valuable for every family. This explosion box card celebrates all mothers and grannies and would be perfect for Mothers’ day, their birthdays, or just to say, “Thank you” and “I love you too”. The roses, hearts and butterflies of the C121 Family blessings are perfect for conveying the message of your 
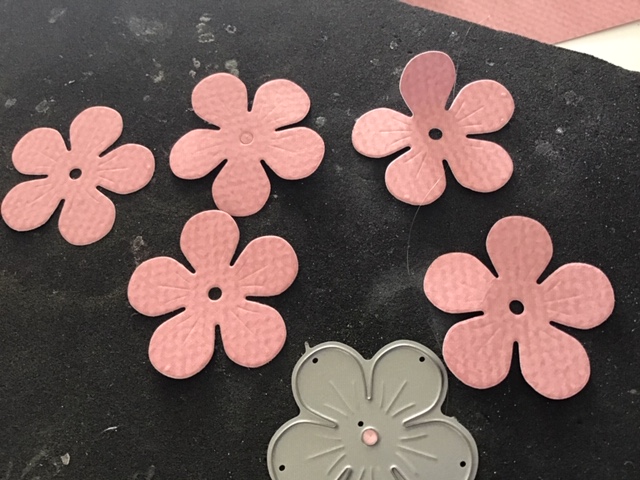
appreciation. I used some of the plain papers from the carders pack to make flowers with stamens and tucked a little tag in between all the fussy-cut elements for your personal message.


For this project you will need:
·        One sheet each of FabScraps Family blessings collection C121-009; C121-007 (for fussy cutting); C121-008; C121-006
·        Pink and green plain papers from the FabScraps carders’ pack MC120-001
·        FabScraps metal embellishments from the C121 carders’ pack (birdcage)
·        FabScraps pink satin rose from the C121 carders’ pack
·        4 Handmade flowers, using plain pink paper from the FabScraps C121 carders’ pack and some stamens
·        FabScraps liquid glue
·        Scissors for fussy-cutting (I lIf you buy the card-making kit from us, you will receive instructions and a template for the box.
·        Versamagic pixie dust teardrop ink pad
·        Chipboard rocking chair, assembled and painted with white gesso
·        Foamiran or paper rose and bud for lid
·        Die-cut leaves and twigs
·        Chipboard heart, painted with white gesso
·        Foam tape for lifting some of the fussy-cut elements
·        Green glass pebble
·        3 silver metal embellishment leaves
·        Bias binding, coloured pink with Versamagic pixie dust teardrop ink pad or pink all-purpose ink


Instructions:
F     1. Fussy cut all the flowers and elemens on teh fussy-cut page.
2.    For the outside panels of the box, cut four pieces of striped paper from C121-009 9,5x9,5cm.
3.      For the outside panels of the box, cut four pieces of rose-patterned C121-006paper from C121-009 9,5x9,5cm
4.      For the inside panels, cut four pieces of plain dark green paper from the carders’ pack 9,5x9,5 cm.
5.      For the inside panels, cut four pieces of plain dark pink paper from the carders’ pack 9x9 cm.
6.      For the “floor” of the box, cut dark pink plain paper 9,5x9,5cm.
7.      For the top of the lid, cut dark green plain paper 9,5x9,5cm.
8.      For the lid, cut a piece of 9x9cm from the revers of the striped paper C121-009.
9.      Chalk the edges of the striped panels.
10.   Distress the edges of all panels.
11.   Layer pink panels onto green panels and striped panels onto rose-patterned panels. Adhere the striped panels to four outside panels of the box and the green/pink layered panels to four inside panels of the box. Adhere the pink “floor” of the box.
12.   Adhere decorative cut-outs to outside striped panels. Arrange fussy-cut flowers, sentiment tag, chipboard heart, die-cut leaves and twigs, metal and other embellishments on the four inside panels.
13.   Adhere the rocking chair to the floor of the box and decorate with butterfly, flowers and leaves.
14.   Make a tag for writing a personal message and tuck it in behind some of the decorative elements.
15.   Voila! Your project is ready for giving.

Sunday, 1 March 2020

Sunshine single page

Cheerful and summery pictures call for nice bright colours in a layout.
For this single page on which I still need to use a picture of a niece in the park, I used our new bright and breezy Fresh summer paper pack from Lemoncraft.


To create the layout, start with one of the pretty papers in the pack. I decided on the sheet with woodgrain texture, to contrast with the flowers I wanted to add.
Fussy cut two flower cluster strips from the edges of another sheet. Set aside.
Tear a large piece, approximately 18cm wide and 13cm high from the tiny gold dot vellum sheet. Tear along all four edges for an uneven effect.
Adhere this to the background with dries clear glue.
Stencil on the left lower and top right corners with texture paste or thick white gesso. When dry, rub a small amount of gold paste over some of the stencilled design. The picture below shows the lovely effect. It echoes the wood grain texture, especially because the gold paste also is only applid here and there, not to completely cover the texture paste.


Adhere one flower strip with the bow to the page as in the position in the first picture of the completed layout above. 
Adhere the second flower strip to a piece of brown cardboard from a box to lift it for dimension, and adhere slightly to the right and higher than the first strip.
Tear a strip of paper from one of the green designs. Adhere a layer of brown cardboard to the back, to lift and then adhere it to the background.
Cut white cardstock 16x11 cm and adhere to the background with a double layer  of brown cardboard.
Embellish the page with lots of flowers, twigs, a cut-out bow, filler flower stems, die-cut leaves and a piece of tulle.


I am entering this layout for the Lemoncraft March challenge. Only saw the challenge the morning after I had completed the layout but I must be honest, I really was inspired for this page by the lovely pinks and greens in this paper collection. You may visit the Lemoncraft blog to get fabulous inspiration by the Lemoncraft design team https://purplemagnolia-papercraft.blogspot.com/2020/03/sunshine-single-page.htm
Thank you for visiting.
Links to the products used are given below.
Remember you can follow this blog by clicking on the top right corner on this page, or opt to receive blog posts in your inbox by entering your e-mail address in the Subscribe box.
Happy crafting, until next time.
Marie Smith