Thursday, 20 January 2022

Have a sunny day - Card tutorial

 Hello, fellow crafters

Don't you just love sunflowers, with their cheerful faces, and the fact that they turn their faces to the sun all day? Such an inspiration, with a message for us, to face the sunny side of life, no matter how challenging life may be.

Today I am sharing a card taught in a class last year. This card is perfect to send to someone who needs some uplifting.


Products used:

Smooth white cardstock 240gsm, A4, for the card base

Green cardstock 14x14cm

White cardstock for a mat 13,5x13,5 cm

Printed paper form the Heartfelt Creations floral banners paper pack 13x13cm

Heartfelt Creations rustic sunflower stamps and dies for the small flowers

Heartfelt Creations rustic sunflower can & freezer stamp and die set

Heartfelt Creations peony & sunflower banner stamp and die set

Heartfelt Creations flower-shaping mat and ball tools

Yellow ink pad, for example Ranger archival sunflower or Artistry golden turmeric

Orange ink pad, for example Ranger archival monarch orange or Artisry fall fiesta

Green ink pad, for example Ranger archival olive

Brown ink pad, for example Ranger archival sepia

Brown beads, glass shards or flowersoft for flower centres 

Printed or stamped sentiment (I used one printed on vellum)

Make the flowers and can:

Stamp small sunflowers with orange ink. Colour them with orange and yellow ink and daubers. Use the co-ordinating dies to cut them out. Then shape them on a flower-shaping mat with ball tools.

Adhere two layers of petals to make the flowers and add centres.

Stamp leaves with green ink and colour them. Cut out with the co-ordinating dies. Shape lightly with ball tools.

Stamp the can, colour and cut out.

Make the banner:

Stamp teh banner with green ink. Colour with daubers and then cut it out with the co-ordinating dies.

Assemble the card  as shown in the picture.

Thank you for stopping by.

Happy crafting, until next time.

Marie Smith


Layers of frames and peachy florals


 Hello, fellow crafters

Don't you just love making and giving cards with pretty flowers? They are SO special to the recipients - like a fresh flower bouquet, but lasting much longer. 

Today I am sharing a shaped card that I taught in a class recently.

 
Products used:
  • Heartfelt Creations fancy classic rectangle frame HCD2-7384
  • Heartfelt Creations curvy floral frame stamp set HCPC-3976
  • Heartfelt Creations curvy floral frame die set HCD1-7387
  • Heartfelt Creations lush lilac stamp set HCPC-3816
  • Heartfelt Creations lush lilac die set HCD1-7170
  • White shimmer cardstock 300gsm 
  • Peach shimmer cardstock
  •  Versamark embossing ink pad
  • Ranger super fine white embossing powder
  • Ranger archival ink coral coast
  • Ranger archival ink pad deep purple
  • Heartfelt Creations flower-shaping mat and tools
  • Daubers
 
  1.  Cut a shaped card base from A4 white shimmer cardstock, by first scoring and folding to form an A5-sized card. Position the largest die from the fancy classic rectangle set so that the cutting edge is slightly past the left-hand side (fold) of the card. 
  2. Use the same die to cut out white cardstock that will be adhered to the front of the card.
  3. Use the third and fourth dies (counting from the largest) and cut out two frame pieces.
  4. Use the second largest and third largest dies and cut from peach shimmer cardstock. You will only use the largest and the smallest (solid) piece on this card. The frame that is left over, can be used on the inside of the card.
  5. Stamp flowers from the curvy floral frame set on plain smooth white cardstock with Archival coastal coral ink pad. Use daubers to colour only the centres of the flowers. Cut the flowers with the co-ordinating die. Shape the flowers on a flower-shaping mould with ball tools.
  6. Stamp the lush lilac flowers and twigs on vellum paper with Versamark ink. Sprinkle white embossing powder over. Shake off excess powder and heat-set the embossing powder. Colour teh flowers at the back with purple ink and the sprigs with green. Cut out with the co-ordinating dies.
  7. Assemble the card as shown in the picture.

Thank you for stopping by.

Happy crafting, until next time.

Marie Smith


Wednesday, 12 January 2022

GARDENING PLANNER/JOURNAL WITH FABSCRAPS


Make a gardening journal/diary for yourself or one of the keen gardeners in your life.

I have always loved plants and gardening, but Covid-19 gave even more meaning to the concept of creating our own garden sanctuaries. Many years ago, Keith Kirsten published a garden planner in diary form. My garden panner and recorder – though not nearly in the same format – was inspired by the concept of planning and recording what goes on in my garden.

I created some pages on my computer, for adding to the fabulously pretty papers in the Out and about collection. The names of the sheets in the paper collection served as inspiration for my page titles for recording various aspects in my planner. I added larger rings for the chipboard mini album so that I can keep on adding pages as I need them, so I better keep an extra pack or two of the papers to make this possible.


For This Project You Will Need:

·        FabScraps C135 Out and about paper pack

·        Fabscraps C135 chipboard mini album

·        Fabscraps DS135-02 leaves stencil

·        Ranger texture paste

·        Large album ring closures

·        Prima acrylic paint opal magic rose gold

·        Rose gold or bronze shimmer powder

·        Printed pages to record your planning and what goes on in your garden

·        Chipboard leaves by The Purple Magnolia, coloured green with an ink pad

·        Page titles (designed and cut out with my electronic cutting machine)

·        Paper flowers for embellishing some of the pages


Instructions:

1.      Paint one part of the die-cut mini-album cover with the opal magic paint. While still wet, randomly rub in some rose gold or bronze shimmer powder.

2.      Trace the outline of the die-cut cover onto one of the sheets from the paper pack (I used a green for contrast) and fussy-cut it out. Adhere to the back of the die-cut cover. On the back, apply texture paste through the leaves stencil. Allow to dry properly before handling further.

3.      Design and cut out titles for the pages of your planner. I was inspired by the names of the sheets in the pack:

·        Out and about = Trips to the garden centre, to by seasonal plants and items.

·        Splash of colour = Such lovely colour in my garden (pictures of my favourite flowers as they bloom, with the name of the plant and date of flowering)

·        Breathtaking = Very special plants/flowers/corners in my garden (pictures of special plants, flowers or spaces in my garden, with the name of the plant and date of flowering

·        Clean up = What to tidy up, per season

·        Ready for lunch = Veggie seeds or seedlings to plant. During lockdown, I started growing veggies in pots in the back yard of my townhouse garden)

·        In bloom = What grows bet in my garden every season

·        Bucket of love = Gardening tips and care

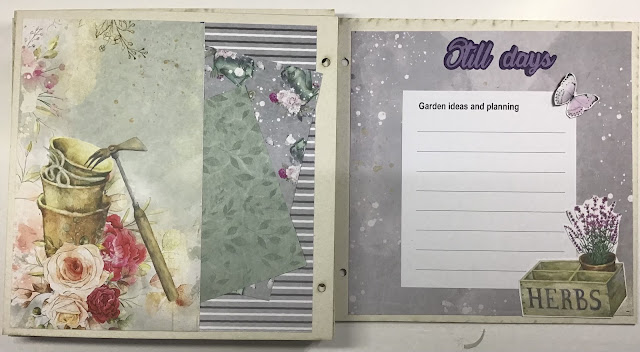
·        Still days = Garden ideas and planning, for quieter times in the gardening cycle, or when I browse Instagram for gardening ideas

4.      For each page in the planner, cut printed paper 19cm wide x 19,5 cm high and adhere to the pages. I used two pieces of “off-cuts” to create pockets on some pages. Inro these I can slip seed packets, notes or pictures.

5.      Add the planner prints that you designed (or write them on white paper and adhere these to the printed papers.

6.      Embellish pages to your taste. Pictures below serve as inspiration.

Happy crafting, until next time!

Marie Smith


FLORAL SINGLE PAGE SCRAPBOOK PAGE

 This single page layout is perfect for a wedding, maternity shoot or matric dance photo.


For This Project You Will Need:

·        One sheet each of FabScraps C124 Reawakening collection – C124-001, C124-004 and C124-008

·        Fabscraps Poppy field silicone stamp set

·        Fabscraps pearls MP1-106 purple 4mm

·        Fabscraps liquid glue

·        Fabscraps Love sentiment charm

 Other products used:

·        The Purple Magnolia PM-004 chipboard daisy strip, coloured with dark pink and purple inks and cut into separate daisies

·        A4 vellum paper

·        Anti-static embossing pad

·        Versamark embossing ink

·        Silver embossing powder

·        Heat tool for heat embossing

·        Purple and dark pink ink pads

·        Daubers

 Instructions:

1.      Cut out a 14cm circle from C124-001. Adhere to the layout page.

2.      Fussy cut the flowers from C124-004, all around the top edge of the flower strip.

3.      Adhere the fussy-cut flower strip to the bottom edge of C124-008. When applying glue, leave about 1cm from the top without glue, to enable you to tuck vellum flowers under the strip.

4.      To make the vellum flowers:

·        Dust vellum lightly with ant-static pad. Stamp flowers on vellum using Versamark embossing ink.

·        Sprinkle stamped flowers with silver embossing powder. Tap off excess embossing powder and heat-set the stamped images. Cut out around the edges of the flowers. Adhere a few flat-back pearls in the centres of flowers.

5.      Arrange photo, cut into circle, and vellum flowers. Alternate the vellum flowers in layers behind the printed paper circle and the photo.

6.      Embellish further with chipboard daises, green die-cut leaves and Love charm.

Happy scrapbooking, until next time!

Marie Smith


MINI ALBUM TRIO IN CHEST WITH ANTIQUE FEET

 Hello, fellow crafters


This project gave me much pleasure. I used Fabscraps C128 Life stories paper collection.

A video tutorial is available on our Youtube channel, at this link https://www.youtube.com/watch?v=A1NXZnwJlGE

Thank you for visiting. Happy crafting, until next time!

Marie Smith

How to shape cherry blossoms without a mould

 Hello, fellow crafters

I just love the cute cherry blossoms I make, using the Heartfelt Creations tweet cherry blossoms set of stamps and dies.

A co-ordinating mould is available for the tweet cherry blossoms, but I wanted to show how you can shape cherry blossoms - and other tiny blooms - without a mould.


Happy crafting, until next time.
Marie Smith


Quick card using extras from other projects

 Hello, fellow crafters

In this video, I demonstrate how to  make a quick, 5-minute card, with elements leftover after creating other cards using Heartfelt Creations stamps and dies.

The pretty birds are from the floral song stamp-and-die set. I also used:

  • Cherry blossoms, made using the tweet cherry blossom stamp, die and mould set
  • A left-order lace die-cut
  • A piece from the Heartfelt Creations regal lattice gateway die set
The purple background was an alcohol ink experiment.


Happy crafting, until next time.
Marie Smith


CONCERTINA BOX FOLIO CARD WITH FRAGRANT HYACINTHS AND CHEERFUL DAFFODILS


Hello, fellow crafters

This concertina box folio card is a very special card.

Make the concertina box card by cutting and scoring as follows:


Stamp, colour and shape fragrant hyacinths and spring daffodils, using the stamps, dies and moulds from the Heartfelt Creations springtime collection.

Cut printed papers from the co-ordinating paper pad, and embellish the box card with the flowers.

Happy crafting, until next time.

Marie Smith

Vellum poinsettias on dots for a Christmas card in non-traditional colours


Hello, fellow crafters

If you like making Christmas cards in non-traditional colours, then white, silver and turquoise if always a winning, elegant combination. 

For this card, I used the Fabscraps poinsettia stamp set to heat-emboss flowers on vellum. These were used on a pretty poinsettia die background and a paper from the What the succulent paper collection y The Purple magnolia, designed by our very own designer, Suzanne Smith du Plessis.

Products used:

  • White shimmer card base, 14,5 cm square
  • Silver mirror cardstock  for layer, 14cm square
  • Turquoise dots paper for layer, 13,5 cm square
  • Creative Expressions poinsettia filligree frame die set
  • Fantasy FD929 leaves from silver mirror cardstock
  • 2 small single-layer vellum poinsettias (heat-embossed on vellum)
  • 1 medium double-layer vellum poinsettia
Happy crafting, until next time!
Marie Smith


Lacy gift basket, using a Heartfelt Creations gateway die


Hello, fellow crafters

This pretty gift basket is perfect for any occasion. 

Products used:

Heartfelt Creations lattice swirls gateway die
Heartfelt Creations wild aster stamp and die set
Heartfelt Creations wild aster spray stamp and die set
Curious metal silver ice 300gsm cardstock
Small flower pearls
Archival ink pad majestic violet
Archival ink pad magenta hue
Artistry ink pad green garland
Distress ink pad twisted citron

Gift basket base:


Die-cut 2 pieces of the gateway from the curious metal cardstock. Adhere these to the front and back of the gift basket base.

Stamp wild asters using archival ink majestic violet. Colour the flowers with this ink and magenta hue, using daubers. 
Stamp leaves using Artistry green garland ink pad. Colour leaves using this ink and distress twisted citron.
Use the co-ordinating dies to cut out the flowers and leaves.
Shape flowers using ball tools or groove tools. Add small flower pearls to the centres.
Arrange flowers and leaves on the gift basket.
Use a ribbon to tie at the top of the gift basket.

Happy crafting, until next time!
Marie Smith


Cascading gatefold card with belly band


Hello, fellow crafters
Today's inspiration is a cascading gatefold card, with a pretty belly band to keep it closed. it is quite a surprise to open the card!
To start, cut and score the card as follows:

Cut printed paper to fit onto all teh panels and assemble the card.


Happy crafting, until next time!
Marie Smith

Pansy favour box

 Hello, fellow crafters

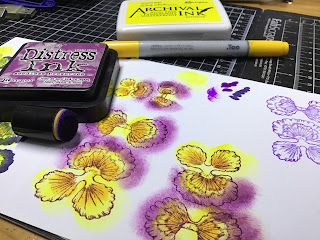
In this post, I share some tips for making pretty, cheerful pansies, using the Heartfelt Creations cheerful pansy stamp-and-die-set and the treasured heart gift box die set.


The colours I used for the pansies:


After colouring, the matching dies were used to cut out the flowers and leaves. These were then shaped, using the co-ordinating mould.

The box was made using the treasured heart gift box die.
Happy crafting, until next time.
Marie Smith

FLIP-TOP CHRISTMAS GIF BOX


Hello, fellow crafters

Christmas time is a time when we give gifts of love - small or large - it is all about the loving thoughts.

This cute flip-top box is perfect for gifts that are not too large, for example, hand lotion, hand soap, silk scarf, chocolates or even home-made cookies.

I used the beautiful Fabscraps C134 Christmas kisses paper pack. the poinsettias were heat-embossed, using the Fabscraps poinsettia stamp set - one of my all-time favourite poinsettia stamps.

The box has a flip-top lid.

The completed box is 15 x 15 x 5 cm

STEPS

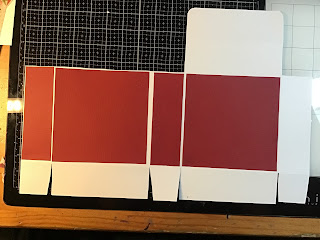
1. Cut and score two pieces of smooth 240gsm cardstock as follows. The dotted lines indicate score lines.


Adhere the two pieces of cardstock to each other on the sides of the box, by overlapping the right-hand side of the smaller piece and the left-hand side of the larger piece.


1. Round the corners of the flip lid.

Cut 2 pieces of red cardstock 14,5 x 14,5 cm and 4 pieces of 4,5 x 14,5 cm.

Cut 2 pieces of printed paper 14 x 14cm and 4 pieces of 4 x 114cm

Adhere red cardstock and printed paper panels to the box, as shown in the pictures.


Assemble the sides and bottom of the box.

NOTE: You can use a ribbon to tie around the box. Make a tag from printed paper and embellish.

Happy crafting, until next time!

Marie Smith


Altenew lingonberry cards with a Christmas feel


Hello, fellow crafters
Today I am sharing 4 cards featuring the Altenew lingonberry stamp-and-die set. This is quite a cute and very versatile little set. these 4 cards have a Christmas theme.

CARD 1 - Cut n emboss


Card base: 21x15cm scored at 10,5cm when long side of cardstock is at top of scoring board.
Embossed panel: Ink the thin raised side of the English Boutique ornate frame CR000011 cutting and embossing folder. Insert cardstock and roll through machine. Adhere to card base and trim card to the same size.
NOTE: If you wish to add a stamped sentiment, do that before adhering the
Complete the card: Arrange 4 green stamped branches around the opening. Attach them with small pieces of foam tape for dimension.

CARD 2: HAPPY HOLIDAYS BORDER

Card base: die-cutting done with Spellbinders candlewick exquis topper (white cardstock 27,5 cm x 14,5 cm, scored at 14,5 cm with long end of cardstock at top of scoreboard.

Adhere green cardstock 14,5 x 14,5 cm to inside of die-cut side.

Heat-emboss sentiment: Use anti-static pad over area where heat-embossing will be done. Stamp sentiment with Versamark. Sprinkle silver embossing powder and heat-set.

Complete the card: Arrange and adhere 3 green stamped branches around the opening. Attach them with small pieces of foam tape for dimension.


CARD 3: HEAT-EMBOSSED BERRY BRANCHES


NOTE: Star circle has been heat-embossed  with silver embossing powder.

Heat-embossed lingonberry branches: Follow heat-embossing steps (as explained for card 2 sentiment). Make 4 branches and cut out. Colour the stems, leaves and berries with markers.

Card base: 29x14,5 cm scored at 10,5cm when long side of cardstock is at top of scoring board.

Sentiment: Heat-emboss with silver OR use a die-cut sentiment.

Complete the card:

·       Adhere silver mirror cardstock panel to card base.

·       Adhere navy panel to silver panel.

·       Adhere heat-embossed star circle.

·       Arrange lingonberry branches and poinsettia.


CARD 4: CHRISTMAS ORNAMENTS


Stamped lingonberry branches: Stamp and colour 2 branches as explained in general notes.

Card base: DL (21x21cm scored at 10,5cm)

Complete the card:

·       Adhere stitched die-cut panel to card base.

·       Adhere silver ornament die-cuts to red die-cuts.

·       Arrange and adhere ornaments, ribbon and branches.

·       Finish off with a bow.


Happy crafting, until next time!

Marie Smith


Tuesday, 11 January 2022

Desktop photo box in the shape of a typewriter


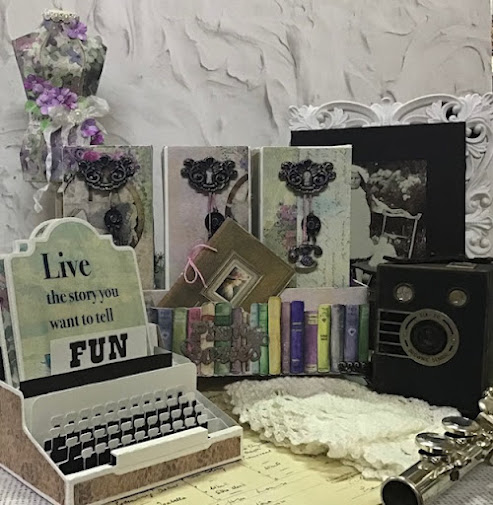
The Fabscraps C128 Life stories collection with vintage images is ideal for recording memories over generations.

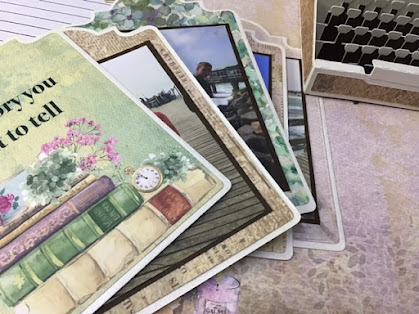
This typewriter desktop photo box is part of a set of projects used to record history and memories over 5 generations. This specific project, that represents one of the younger families, was inspired by the sentiment on one of the sentiment pages in the collection: Live the story you want to tell. My daughter and her family with 3 sons have a lot of fun together.


For This Project You Will Need:

·        Pattern for typewriter (I adapted an SVG file for a typewriter box card that I had bought to create a floor)

·        Fabscsraps C128 Take a moment papers

·        Heartfelt Creations album tags die set (or other tag die or template with two sizes)

·        Fabscsraps white craft glue


Instructions:

1.      Assemble the typewriter box according to instructions.

2.      Cut out 6 tags from firm cardstock using the largest die (or template).

3.      Cut out12  tags from C128 printed papers, using the smaller die (or template). These will be used on the back and front of the tags as photo mats.

4.      Add photos to the tags.


 Happy crafting, until next time!

Marie Smith