Thursday, 1 December 2022

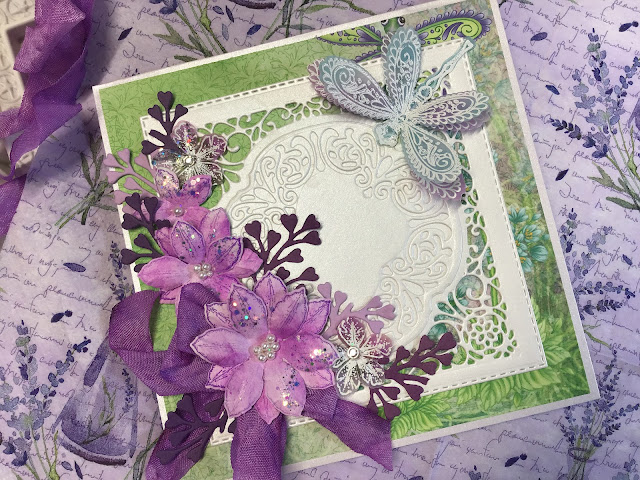
In the garden - mixed media card

 Hello, fellow crafters

I love my garden (mostly evergreen with a pop of colour here and there) and I love arum lilies (also called calla lilies). Today I am sharing a card featuring pink arum lilies.

 This pretty Studio Light stamp has been sitting on my desk for quite some time, waiting for inspiration to do it justice. I knew I wanted to create a water-colour effect and a journal-style background. But don't be intimidated (I know many crafters feel intimidated by watercolour techniques - no watercolouring here. I used an ink squishing technique that I developed recently with heat-embossed images.

What I often do while waiting for the final inspiration to use a specific product, is to put the things I think I could use out on a side table next to my main desk. In time, ideas grow and then I know what I want to do. This card was finally inspired by the prompt on the Ujabule Art Journalling Facebook page: In the garden.

The process I followed was as follows:

1.  Masked the edges of a 13x13cm piece of watercolour paper with washi tape.

2. Brayered Distress Oxide salvaged patina to cover the unmasked square.

3. Brayered a small amount of Distress Oxide seedless preserves.

4. Splattered water onto the inked paper and allowed it to sit a few minutes before blotting the drops with a paper towel.

5. Heat-embossed the Studio Light calla lily stamp with white embossing powder onto watercolour paper.

6. Dabbed seedless grape and mowed lawn Distress oxide inks onto my glass mat and spritzed with water, to form watercolour ink. 

7. Roughly cut out the heat-embossed image and pressed it face down into the watercolour inks, with the flowers more or less in the seedless grapes and stems and leaves more or less on the green mowed lawn. When the image was dry, I used my finger to add more pink and green on selected parts of the image, for more intense colour in the centres of the flowers and on some parts of the leaves. Cut out, close to the edges of the image, with detail scissors.

8. Used seedless grape and salvaged patina inks to stencil in the background, using the Studio Light mask Birds and twigs.

9. Stamped some borders left, right and at the bottom, to "ground" my image.

10. Adhered the calla lily image with dimensional tape.

I hope you enjoyed your short visit.

Happy crafting, until next time.

Marie Smith


Saturday, 12 November 2022

Nativity card

 Hello fellow crafters


For today’s card,  I used the Crafters Companion Bethlehem die set. The elements were die-cut from our heavy curious metal cardstock for the lovely effect. They were mounted onto a navy square, which had been mounted on a silver mirror cardstock square. Both these squares were cut out with Nellies stiched square dies.

The stars were stencilled with Cosmic Shimmer frosty sparkle paste, using our PM-S001 stencil.

Get the supplies from our online store.

Happy crafting, until next time.

Marie Smith

Tuesday, 8 November 2022

Wildflower field

Hello fellow crafters.

Today I am sharing a card on which I  used the Studio Light decorative leaves die set.


I wanted to create an informal effect so I decided to colour the leaves and flowers with brush pens for a watercoloured effect.

The elements were die-cut from watercolour paper.
I used brush pens to loosely apply only a little colour. For the stems, for example, I applied lime. I then sprayed generously with water before applying moss.
Orange and purple were used to colour the flowers in the same manner.
I used the Studio Light flower silhouette embossing folder to create a background. This piece of cardstock was distressed around the edges and layered onto lime green cardstock of which the edges were also distressed before adhering it to the card base.
Stems and flowers were arranged informally.
I hope you enjoyed this post.
Happy crafting, until next time.
Marie Smith


Saturday, 29 October 2022

Christmas is better when we are together

 Hello, friends

When last did you use your washi tapes, or try some of the fabulous new, wide tapes?

 Today I want to share a card demonstrating the amazing results with washi tape for Christmas card, when you have pretty washi tapes at hand.


The moment I laid my eyes on the pretty box 49 and Market holiday wishes washi tape set, i just KNEW I had to make cards and offer a class on using these. 


Naturally, I had to use one of my favorite nested die sets by Studio Light. (I have used this set in many ways on cards.)


This card with the heart aperture is one of the samples I made when preparing for the class.

 Materials and tools required:

 A4 smooth white cardstock, 24gsm

Gold mirror cardstock

All-purpose gold ink (or gold alcohol ink)

Splatter brush 

Black ink pad

Studio Light nested 6 die set

49 and Market holiday wishes washi tape set

Scoreboard and scoring tool

die0cutting machine with 15cm (6 inch)-wide platform

Art Glitter dries clear glue

Crafters Companion Merry Christmas stamp-and-die set

To make the card

Prepare a card base by scoring the A4 cardstock in half on the 297mm side. Fold and trim to make a square card base of 14,5x14,5 cm.

Use the gold ink and splatter brush and splatter ink on the card front (I made a top-fold tent card).

Open the card base and use heart-shaped die third when counting from the largest to cut an aperture (opening) in the centre of the card.

Stamp the sentiment "is better when we are together" from the stamp set at the bottom of the card, using black ink pad.

Use the 2nd and 3rd sizes of heart dies to cut a heart frame from the gold mirror cardstock.

Cut the Christmas sentiment from the stamp-and-die-set from gold mirror cardstock.

Adhere the die-cut heart and sentiment to the front of the card., using dries clear glue. The heart should "frame" the aperture.

Use a pencil to lightly trace the outline of the heart aperture on the inside of the card. 

Open the card. adhere a strip of the poinsettia washing tape across the width of the card, to cover the pencil outline. add a strip of the narrow chevron washi tape to the top and to the bottom of the wide washi tape.

Adhere the two hearts that were cut out to embellish the inside of the card.


I hope you love this card, and will make some for your loved ones.

Happy crafting, until next time.

Marie Smith


Thursday, 16 June 2022

The great outdoors

 I recently hosted a workshop on creating cards with an outdoors theme, using the latest release by Fabscraps - C141 The great outdoors.

This paper collection features the most interesting textures and images for a range of outdoors interests and activities, including fishing, hiking, 4-wheel drive adventures, bird watching and camping.

Attendees were advised to decide on a theme for their cards and then group the fussy-cut elements according to that.

They learned three techniques for making embellishments by imprinting with rubber stamps into layers of hot ultra-thick embossing powder. The technique we used was to first dab embossing ink onto a piece of torn greyboard and adding a layer of ultra-thick embossing powder onto that. After it was heated with a heat tool to melt completely, another layer of embossing powder was added and heated. While that is still hot, press a rubber stamp with a botanical theme into the embossing powder and hold it for a few seconds. Use wax to add some colour and highlights - the result is a patina look. 

The second technique to create embellishments, was to paint metal charms with black gesso and, when dry, to add colour and highlights, using wax.


The third technique for making embellishments, is to adhere kitchen foil to cardstock and then die cut leaves using a die that shows veins on the leaves. After cutting out, add some alcohol  inks for colour.


Thank you for popping in.

Happy crafting, until next time.

Marie Smith

Sunday, 24 April 2022

Window to the world - Single page scrapbook layout

 Hello fellow crafters

Today I am sharing inspiration for a single page layout ai created some time Ago.


Use a neutral scrapbook sheet and add fussy-cut elements from the Sentimental story fussy-cut sheet (available in our online store). Add frames from a Mintay frame book to beautifully frame the photos. I added dark brown foamiran flowers, tulle with a bit of glitter and a piece (at the top left) made using icing paste in an embossing folder as final touches.

Happy crafting, until next time.

Marie Smith

Saturday, 16 April 2022

Expert tip: Increase impact on your cards

Expert tip: when putting your cards together: Think impact.

What I mean with this, is to consider what you can do so that your completed card will have more impact. 

To demonstrate, I am using two cards on which the same type and number of flowers were used. The cards have the same basic layout, yet the second card is much prettier and has much more impact than the first one.


The following increased the impact of the second card:

1. Using as the background printed paper that echoes and/or complements the colour of the flowers - although very subtle, you will notice on the right-hand the the light purple (echoing the colour) and the subtle blue (blue is complementary to the purple - it lies next to purple on the colour wheel). If you do not have printed paper, you can create a background by blending distress or distress oxide inks, or by using the alcohol ink technique.

2. Using a layered die-cut in a neutral or complementary colour as additional background for the flowers. In this case, the lace effect of the die-cuts truly make the flowers stand out.

3. Using more than one type of flower. It might not be clearly visible when you first look at the cards, but look at the two small vellum flowers added to the arrangement on the second card.

4. Using interesting leaves. Notice how the interest on the second card is enhanced by using an interesting maiden-hair fern type of die-cut rather than just “normal” leaves. 

5 Layering up and doubling up. Although on both cards the flowers are slightly tucked in behind each other, the second card has much more impact because more of the fern-like leaves create the impression of three dimensions. The dragonfly on the second card is made of two layers, making it more special. 

Let me know what you learned from this post, to help you improve your card-making skills.

Please keep warm and I am praying for the safety of each and everyone of our followers, with the current weather conditions.

Happy crafting, until next time.

Marie Smith

Products used (click on the links to take you to the online store):

Heartfelt Creations decorative dragonfly paper pack

Heartfelt Creations decorative dragonfly stamp-and-die set 

Heartfelt Creations climbing clematis stamp-and-die set

Creative Expressions Lesley layered die set

Thursday, 14 April 2022

QUICK TIP: Use left-over cardstock and bits and bobs to spread gratitude

 Hello, fellow crafters

In today's post, I want to cover three aspects:

  • How to use all those cut-off pieces of cardstock when you make a square card from an A4-sheet
  • How to use all those left-over flowers and bits and bobs from other projects that clutter up our craft rooms and that we just cannot get to chuck in the dustbin or that are too small or too few to use on a full-size card
  • How to say a special "thank" you to service staff such as sales assistants and waiters

 
I have always thought of making tags with the narrow strips of cardstock left over after making my favourite-sized square cards. A new use for them is to use all the bits and bobs that I collect in a box and that always takes up space on the trolley next to my desk: to keep them in a small clear plastic container on the corner of my desk and immediately after I have made a card or two, start using them to make "Thank you" tags to hand to sales person and waiters to say thank you for good service. If they are kept in the outside pocket of my handbag, they will be easy to reach for and hand over.
 
I find the Kcraft "Thanks" stamp set perfect for this purpose. 

On the two tags above, created this morning to use 2 pieces of cardstock after making card samples, I used stamped floral images from the Heartfelt Creations daydream florals stamp-and-die set that were left over after making a card sample and a card designed for a future class. This set from the Decorative dragonfly collection is certainly one of my favourites that will find its way onto MANY projects.
 
I love to hear from you, so please leave me a comment, even if it is to share a tip about how you use left-overs in your papercrafting.

Happy crafting, until next time.

Marie Smith


Tuesday, 12 April 2022

6 Tips for taking your card-making to the next level

 Hello, fellow crafters

Today I want to share tips for taking your card-making to the next level, when using die-cuts.

I will use this card with a lush lilac flower cluster (created using Heartfelt Creations lush lilac stamp, die and mould) as example to explain the tips. The card was not made with the tips in mind, but when looking for examples, I realised that this card fits all the tips I want to share today.


TIP #1: Use complementary colours

Complementaries can make each other appear brighter.

Complementary colours are two colours that are on opposite sides of the colour wheel. In their most basic form, they are one primary color and the secondary color that is created by mixing the other two primaries. For instance, the complementary color to yellow is purple, which is a mix of blue and red. 

Post Image Post Image

 Looking at the colour wheel, it is easy to identify the first set of complementary colours:

  • yellow and purple
  • blue and orange
  • red and green

You will find that the following colours are also complementary:

  • yellow-orange and blue-purple (indigo)
  • orange-red and blue-green (aqua)
  • red-purple (pink) and green-yellow

I found a lovely, workable online tool for selecting complementary colours at this link - you click on a colour wheel the colour you want to find a complementary colour for, and a perfect choice is shown. Here is an example: I clicked on the pink-purple and the green was suggested. You can then match the colours with the cardstock or inks in your stash.


On this card, I used the complementary colours of lime green (yellow-green) and pink-purple. You will notice how the colours pop.

 
TIP #2: Use balance in colour

 It is important to use balance in colour. for example, if you use a bold red, then you should use other bold colours with it. In the card above, balance in colour was established by using the same "weight" - softer lime-green with softer purple-pink.
 
TIP #3: Use balance in layout
Balance in layout means that not all the elements on the card should be bundled into one place. Notice how the small arrangement of flowers in the top right-hand corner provides balance, being placed opposite the focal point of the cluster of lush lilacs.  without that small cluster, the focal point would appear to be too "heavy". 
 
TIP #4: Add interest to the focal point
Interest is created by adding a subtle element to place even more emphasis on the focal point. On this card example, the white leaf frame creates a backdrop that is subtle, yet makes the flower clusters stand out.
 
TIP #5: Add layers
Layers add extra interest and dimension, giving "life"to your cards. 
On this card, an additional layer was created by cutting another leaf frame from silver mirror cardstock and adhering at, slightly off-set to the main white frame. the small flowers are flat enough to create layers, dimension, and texture, without creating a bulky card. The card fits well into an envelope. 
 
TIP #6: Repeat elements
In art, design and visual displays, there is a principle called the principle of repetition: 
the repeated use of particular elements of visual arts to create a pattern, movement, rhythm, or unity. In this card example, the principle was applied in repeating the flowers (though in a smaller cluster for balance). The principle was also applied in repeating the "shine" effect - using silver flower pearls to repeat the use of silver mirror cardstock for the off-set frame behind th3 white.

 I hope these tips will help in enhancing your card-making skills, and encourage you to experiment. Please do try the tips, and share your creations on our Facebook page @purplemangolia.papercraft.

Happy crafting, until next time.

Marie Smith