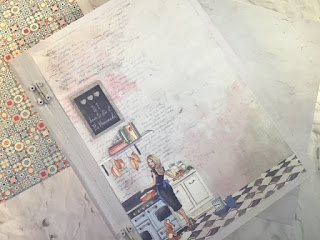
If you love cooking and
preparing meals, your recipe book HAS to be FUN, easy to use and easy to store.
Large album rings were used
for this album, so that you can add as many pages as you want or need. To
ensure that the recipe book stays clean and is easy to store, there are
“pockets” on many of the pages in which you can insert recipe cards, take them
out while you cook and put them back. You can also adhere recipe cards straight
onto some of the pages.
The wooden box allows for
easy upright or flat storage. A pen is stored on the inside to be ready when
you need it to make notes or write down a recipe.


For This Project You Will Need:
·
Fabscraps C125
Meals in heels 30x30 paper pack
·
Fabscsraps C125
Meals in heels (8x8 inch) cardstock paper pack
·
Fabscraps C125
Meals in heels large sticker set
·
Fabscraps metal
charms
·
Fabscraps Meals
in heels recipe album
·
Fabscraps clear
glue
Other materials:
·
2 large album
rings
·
1 piece 20x20cm
chipboard (for additional cover in front of recipe album)
·
Hit glue gun for
adhering metal charms
·
Wooden book box
(available at major stationers and craft stores in South Africa)
·
Light grey
acrylic paint
·
Clear gesso
·
Paper flowers,
chipboard twigs and die-cut leaves
·
Paper trimmer or
guillotine, scissors
Instructions:
1.
Paint the wooden
book box inside with acrylic paint. Allow to dry and paint outside. Leave to
dry completely.
2.
While the box is drying, cut a “cover” for the
front of the wooden book box from one of the sheets in the 30x30cm paper pack.
Paint it on one side with clear gesso (to prevent it from curling and
buckling). When dry, paint on the other side and leave again to dry completely.
When the gesso is completely dry, adhere the paper to the outside front cover
of the book box with Dries clear glue, Tacky glue or thick gem medium.
3.
To fill the extra space in the wooden book box,
make a small box from chipboard, cover with printed paper. Tie two pieces of
elastic cord around to hold a pen. Adhere the box to the inside of the wooden
book box as shown in the pictures.
4.
Cover the chipboard album pages on one side with
printed paper from the collection, after measuring and cutting to size. It is
helpful to trace the around the tabs of the chipboard. Alternate cooking-theme
apers and papers from the plain cardstock pack.
5.
Use a punching tool to cut holes in the
scrapbook paper in the exact position as the holes in the chipboard pages.
6.
Turn around and cover the reverse sides of the
chipboard pages with printed paper/plain cardstock. Remember to cut the
additional piece of cardstock to the same size as the square that comes as part
of the recipe album. Cover that on both sides as describes and make holes for
the rings.
7.
Prepare additional pages for your recipes by
cutting them in squares the same size as the square chipboard page. Make
“pockets” for inserting recipe cards by cutting paper strips that are the same
width as the chipboard pages and 8cm high. Adhere these to the paper pages with
glue ONLY at the left, bottom and right-hand sizes. This will leave an opening
at the top, into which you can insert recipe cards and/or cooking tips.
8.
Insert the rings into all pages to make up the
recipe book.
9.
Decorate inside pages and write recipe
categories (e.g. Casseroles, Pies, Veggies, Sweets, etc.) on the chipboard page
tabs.
10.
Lastly, decorate the front cover.
11.
Insert recipe cards into packets and write
recipes on some plain pages.
I hope you likes it and that you are inspired to create your own recipe book in a wooden box. This paper collection is unfortunately a sell-out at Fabscraps, but The Purple Magnolia will soon have two awesome cooing-themed paper packs by lemoncraft in stock.
Remember that y7ou can Follow my blog posts by clicking on the Follow button in the top-right-hand corner of this page. If it is more convenient to receive my blogs by e-mail, simply type your e-mail address in the Subscribe block.
Happy crafting, until next time.
Marie Smith
e


